Maintaining a backyard bird feeder can quickly become an expensive hobby, as many hobbyist gardeners discover at the checkout counter. However, with a simple coat hanger, you can easily create a cost-effective solution that will attract a wide variety of feathered friends to your garden. This ingenious DIY project not only saves you money but also allows you to engage with nature in a more meaningful way.
In this article, we’ll guide you step-by-step through the process of transforming a humble coat hanger into a functional and attractive bird feeder. Unleash your inner handyman or handywoman and discover the joy of creating your own unique feeding station for your feathered neighbors.
The Basic Material: The Unassuming Metal Coat Hanger
The key to this cost-saving project is the unassuming metal coat hanger. This everyday household item can be easily repurposed into a sturdy and practical bird feeder with just a few simple modifications. The malleable nature of the metal allows you to shape it into the perfect feeding station, and its durability ensures it will withstand the elements and provide a reliable food source for your avian visitors.
Gather your coat hanger and get ready to put your DIY skills to the test. With a little creativity and a few basic tools, you’ll be on your way to creating a one-of-a-kind bird feeder that will bring joy to your garden and its winged inhabitants.
Upcycling household items is not only a budget-friendly solution but also an environmentally conscious choice. By giving a new life to an otherwise discarded object, you’re actively contributing to the circular economy and reducing waste. This project is a true win-win, allowing you to save money while also making a positive impact on the natural world around you.
Tools and Accessories: What You’ll Really Need
To transform your coat hanger into a functional bird feeder, you’ll need a few basic tools and materials. Gather the following items:
- Metal coat hanger
- Pliers or wire cutters
- Scissors or tin snips
- Sandpaper (optional)
- Sturdy wire or string for hanging
- Bird seed or suet (depending on your feathered friends’ preferences)
The great thing about this project is that you likely already have most, if not all, of these items at home. No need to invest in costly specialized equipment – the beauty of this DIY bird feeder lies in its simplicity and accessibility.
Step-by-Step: From Coat Hanger to Feeding Station
Now that you have your materials ready, let’s dive into the step-by-step process of transforming that unassuming coat hanger into a fantastic bird feeder:
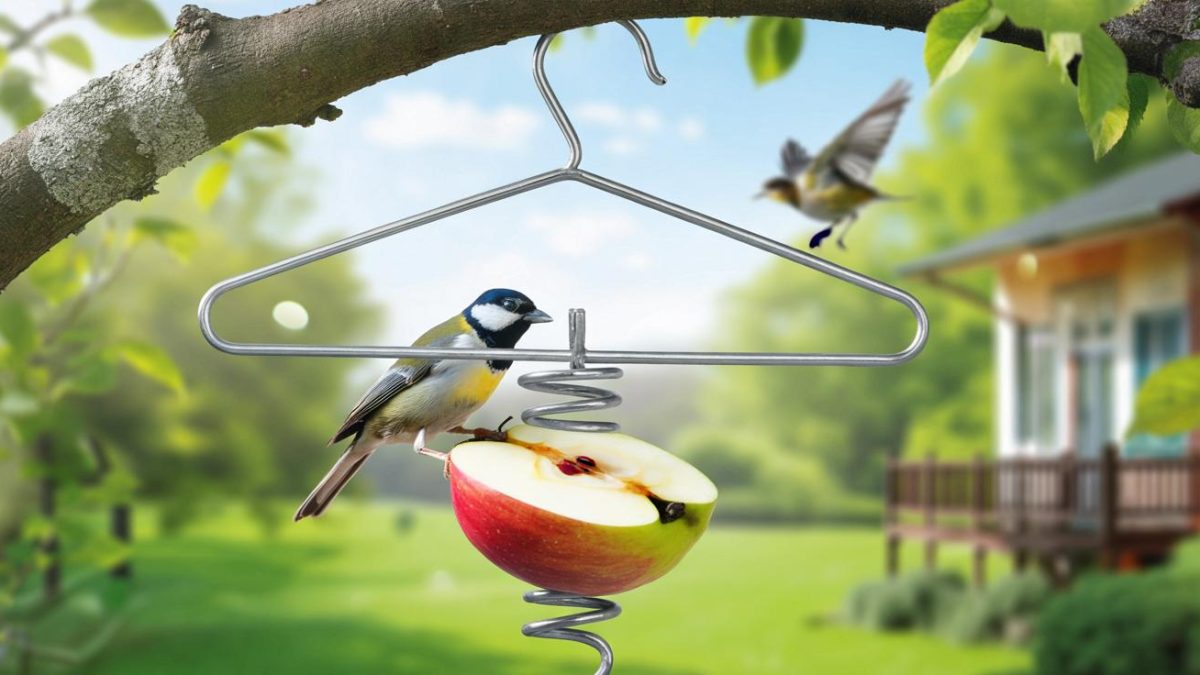
- Straighten the Coat Hanger: Using your pliers or wire cutters, gently straighten out the coat hanger, ensuring it’s as flat and linear as possible. This will provide a sturdy base for your feeder.
- Create the Feeding Cup: Bend the straightened hanger into a circular shape, leaving an opening at the top. This will form the “cup” that will hold the bird seed or suet.
- Add Perches: Using the remaining wire, create small loops or hooks that will serve as perches for your feathered visitors. Carefully bend and attach these perches around the feeding cup.
- Finish with a Hanger: At the top of your creation, form a small loop or hook that you can use to hang your new bird feeder. This will ensure it’s securely in place and easily accessible for your avian friends.
- Optional Sanding: If desired, you can use sandpaper to smooth any rough edges on the wire, ensuring a comfortable and safe experience for your bird guests.
And just like that, your one-of-a-kind bird feeder is ready to be filled and hung in your garden or yard. The simple yet effective design will not only provide a reliable food source but also add a charming, handmade touch to your outdoor space.
The Right Spot for Your New Bird Feeder
Choosing the perfect location for your DIY bird feeder is crucial to ensure maximum visibility and safety for your feathered visitors. Consider the following factors when selecting the ideal spot:
- Proximity to Cover: Place the feeder near dense vegetation, such as shrubs or trees, to give your birds a sense of security and easy access to shelter.
- Visibility from the House: Position the feeder in a spot where you can easily observe and enjoy the avian activity from the comfort of your home.
- Protection from Predators: Avoid areas that are too exposed or close to potential threats, like cats or other predators, to keep your bird guests safe.
- Accessibility for Refilling: Choose a location that allows you to easily access the feeder for regular seed or suet refills.
By carefully considering these factors, you’ll create a welcoming and secure environment for your backyard birds, ensuring they return time and time again to enjoy the nourishment and comfort your homemade feeder provides.
Recycling, Environmental Protection, and Personal Nature Experiences
This DIY bird feeder project not only saves you money but also aligns with important environmental and sustainability goals. By repurposing a discarded household item, you’re actively reducing waste and contributing to a more circular economy. Additionally, providing a reliable food source for birds helps support local wildlife and promotes biodiversity in your immediate surroundings.
Beyond the practical benefits, creating your own bird feeder can also be a deeply rewarding and personal experience. Watching the feathered visitors flock to your handmade creation can bring a sense of connection to the natural world and a deeper appreciation for the incredible diversity of species that inhabit our shared environment. This project is a wonderful way to engage with nature, foster a sense of stewardship, and create lasting memories in your own backyard oasis.
Tips for Long-Term Success
To ensure the longevity and effectiveness of your DIY bird feeder, consider these practical tips:
- Regular Cleaning: Periodically clean the feeder to prevent the buildup of dirt, debris, and potential disease-causing agents.
- Consistent Refilling: Keep the feeder well-stocked with fresh seed or suet to provide a reliable food source for your avian visitors.
- Seasonal Adjustments: Consider adjusting the type of food you offer based on the changing needs and preferences of birds throughout the year.
- Monitoring and Observation: Closely observe the feeder to identify any issues or changes in the visiting bird population, and make adjustments accordingly.
By following these simple guidelines, you’ll ensure your homemade bird feeder continues to be a beloved and effective addition to your garden, fostering a thriving and diverse avian community for years to come.
Frequently Asked Questions
Can I use any type of coat hanger for this project?
Yes, you can use any metal coat hanger, as long as it’s sturdy enough to support the weight of the bird seed or suet. Avoid using plastic or wooden hangers, as they may not be as durable.
How often should I refill the bird feeder?
The frequency of refilling will depend on the number of birds visiting your feeder and the amount of seed or suet it can hold. Check the feeder regularly, and refill it when the food level gets low to ensure your feathered friends have a consistent food supply.
What kind of bird seed or suet should I use?
The type of food you offer will depend on the preferences of the birds in your local area. A mix of seeds, such as sunflower seeds, millet, and cracked corn, can attract a variety of species. Suet cakes are also a popular choice, especially during colder months when birds need extra calories.
How can I make my DIY bird feeder more attractive to birds?
In addition to placing the feeder in a strategic location, you can try adding a few decorative touches, such as colorful ribbons or small wind chimes, to make it visually appealing to your avian visitors. Experiment with different placements and designs to see what works best in your garden.
How do I clean the bird feeder?
Regular cleaning is essential to maintain a healthy and safe environment for the birds. Use a mild soap and warm water to scrub the feeder, and be sure to rinse it thoroughly. Avoid using harsh chemicals, as they can be harmful to the birds.
Can I use the same feeder for multiple types of birds?
Absolutely! The versatile design of this DIY bird feeder allows you to attract a diverse range of bird species. You can experiment with different food offerings to cater to the preferences of various feathered visitors in your area.
How can I protect my DIY bird feeder from squirrels?
To deter squirrels, you can try adding a baffle or cone-shaped shield below the feeder to make it more difficult for them to access the food. You can also consider using a feeder with weight-sensitive perches that close off the feeding ports when heavier animals try to access them.
Can I leave the bird feeder out year-round?
Yes, you can leave your DIY bird feeder out year-round, but you may need to adjust the type of food you offer based on the season. During the warmer months, focus on providing high-energy foods, while in the colder months, suet or seed-based options can help sustain your feathered friends.
How do I encourage more birds to visit my homemade feeder?
In addition to placing the feeder in an optimal location, you can try attracting birds by planting native vegetation that provides natural food sources and shelter. Providing a reliable water source, such as a birdbath or small pond, can also help draw more birds to your backyard oasis.
- ➡Bodenbedeckende Gräser: Diese 5 trittsicheren Pflanzenteppiche sparen richtig Geld
- ➡70 Jahre Grönland-Eisschmelze: Neue Studie enthüllt das wahre Ausmaß der Klimakrise
- ➡Diese Bio-Creme soll Fältchen mildern und den Teint wie weichzeichnen
- ➡Warum Sie Ihren Weihnachtsbaum dieses Jahr viel früher aufstellen sollten